Author: mssomani

  • What is GSM in Knitted Fabrics? and how to measure GSM?

    What is GSM in Knitted Fabrics? and how to measure GSM?

    Welcome back to Knitted Fabric.in! When you are sourcing, designing, or simply trying to understand the quality and weight of a textile, one term dominates the conversation: GSM. This metric is arguably the most crucial factor in determining how a knitted fabric will look, feel, and ultimately, how it will be used.


    Defining GSM

    GSM stands for Grams per Square Meter.

    • Grams (G): A unit of weight.
    • Square Meter (SM): A unit of area (1 meter X 1 meter).

    Simply put, the GSM of a fabric tells you the mass (weight) of the fabric if you cut it into a square meter section. It is a universal unit used across the textile industry to measure the density or substance of any fabric, whether woven or knitted.

    Why is GSM Crucial for Knitted Fabrics?

    For knitted fabrics, which are valued for their stretch and drape, GSM is more than just a weight measurement—it dictates the fabric’s practical use and performance:

    • End-Use Determination: The primary function of the fabric is defined by its GSM. For example, a low GSM jersey knit is perfect for summer T-shirts, while a high GSM fleece knit is required for winter jackets.
    • Costing and Pricing: Raw material cost is directly tied to weight. Higher GSM means more yarn was used per square meter, resulting in a higher cost for the fabric.
    • Handfeel and Drape: A lower GSM fabric is generally lighter, thinner, and drapes more loosely. A higher GSM fabric is thicker, heavier, and feels more substantial, often exhibiting better warmth and shape retention.
    • Opacity: Lower GSM fabrics (e.g., 100 GSM) are often sheer or semi-transparent, whereas higher GSM fabrics (e.g., 280 GSM) are opaque.

    GSM Ranges and Common Uses

    GSM is a sliding scale. Here is a general breakdown of how GSM ranges correspond to common knitted garments:

    GSM Range (Approximate)Fabric CharacteristicsTypical Knitted Product Uses
    80 – 130 GSMVery light, sheer, fine knit. Highly breathable.Inner linings, lightweight scarves, thin summer vests/camisoles.
    140 – 180 GSMLight to medium weight. Standard T-shirt quality.Summer T-shirts (jersey knit), lightweight polo shirts, everyday dresses.
    190 – 240 GSMMedium to heavy weight. Good opacity and structure.Quality polo shirts (pique), comfortable leggings, thicker long-sleeve T-shirts.
    250 – 350 GSMHeavy and substantial. Excellent warmth and durability.Sweatshirts (fleece, French terry), hoodies, jackets, heavy knitted joggers.
    360+ GSMVery heavy, dense knit. Maximum warmth and structure.Heavy winter coats, thick blankets/throws, specialized outerwear.

    How to Measure GSM Accurately

    Measuring GSM accurately requires precise tools and a standardized method to ensure the result is consistent and reliable. The fundamental principle is to weigh a small, precisely cut sample of the fabric and then scale that weight up to determine the weight of a full square meter.

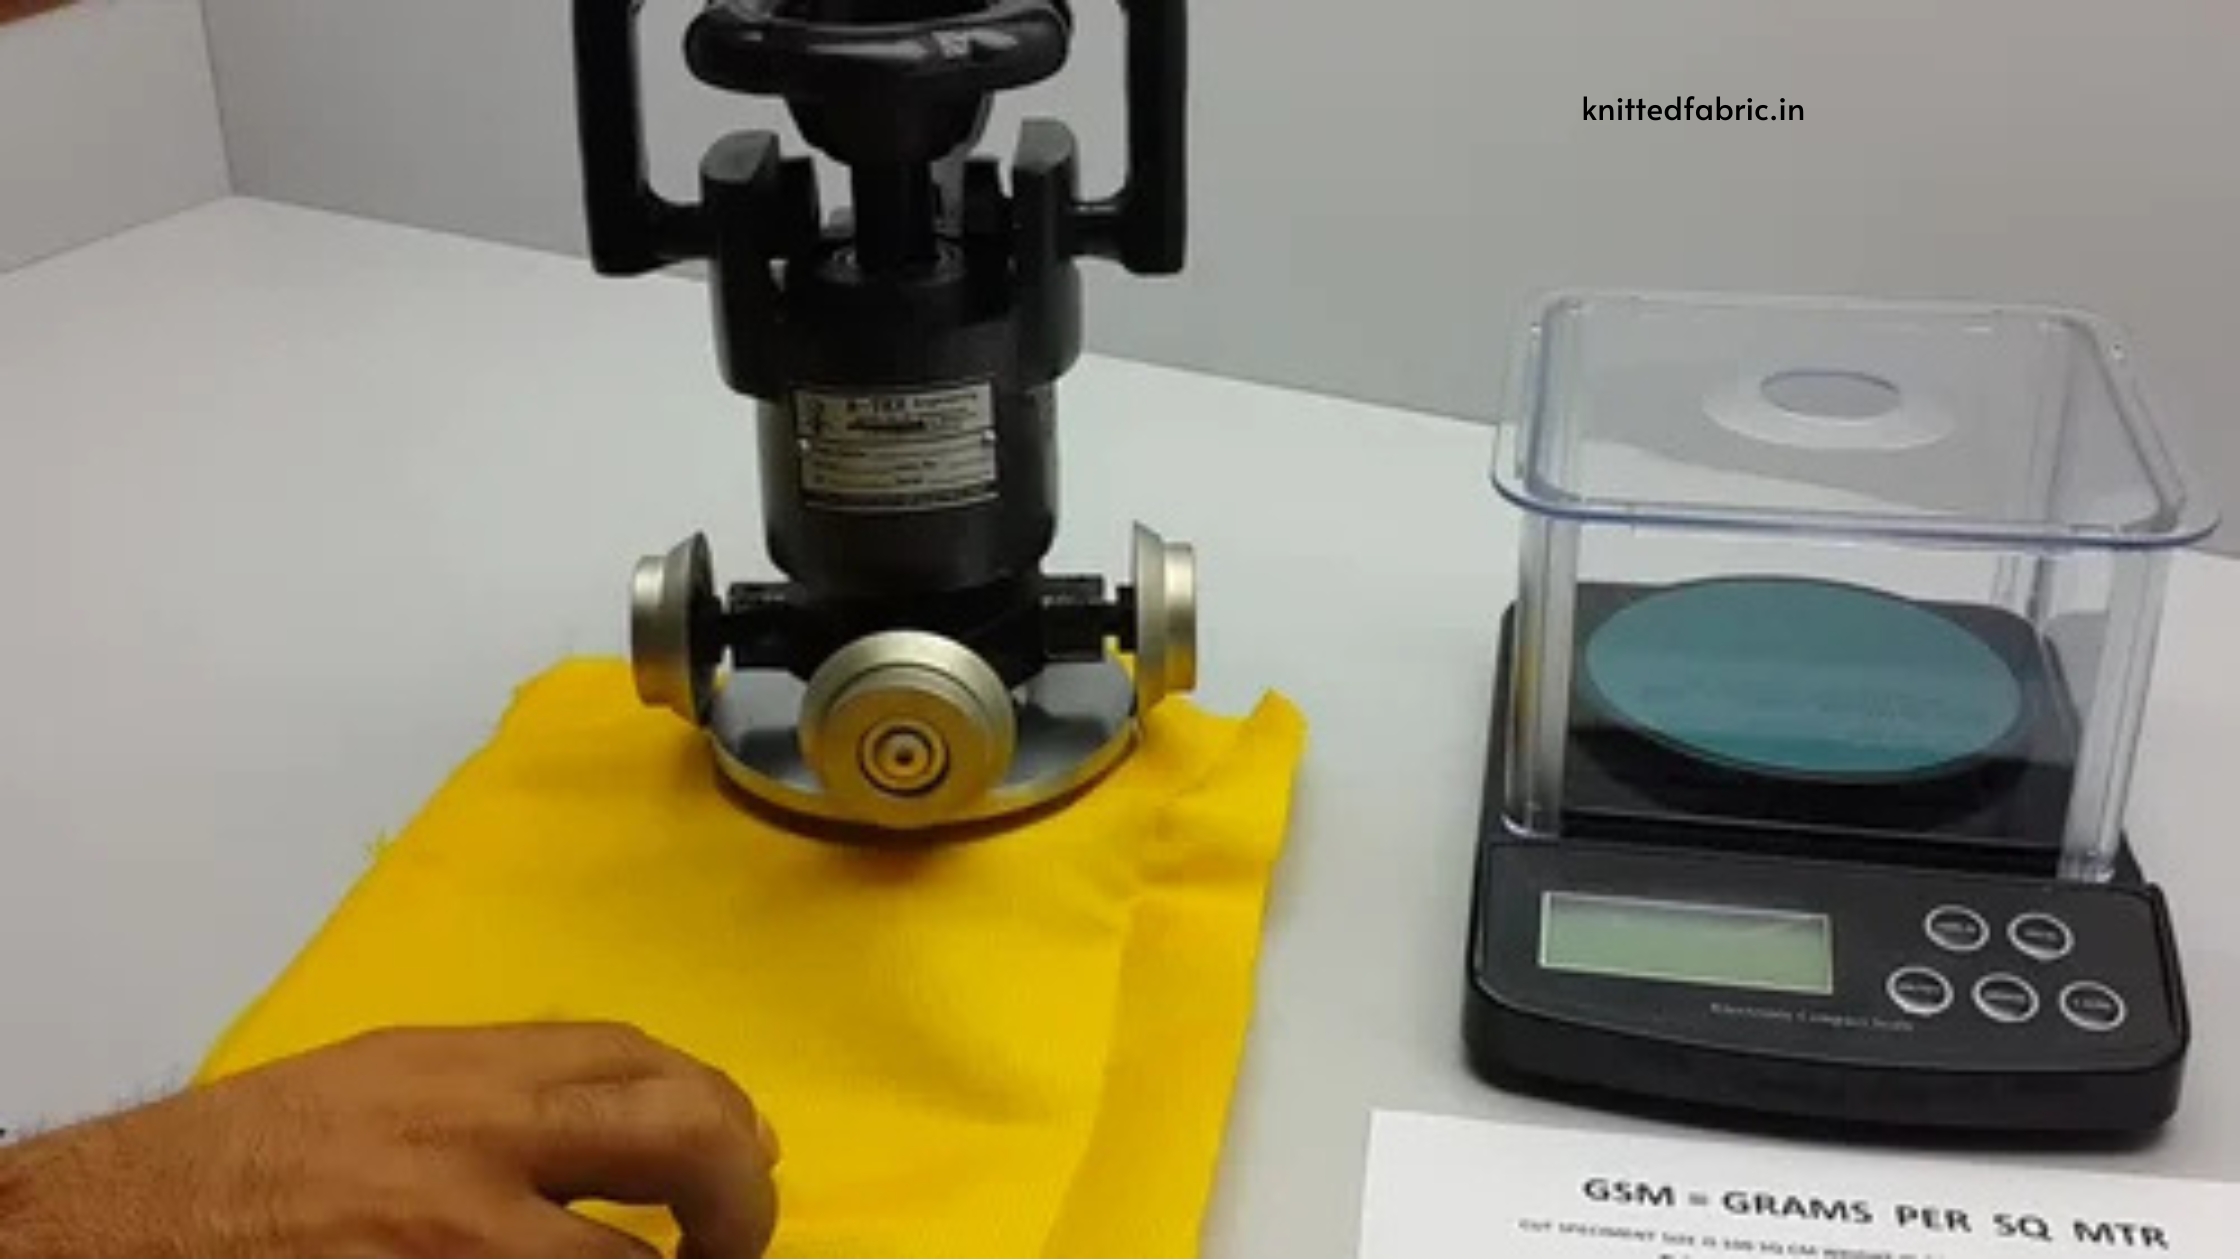
    1. The Tools Required

    • GSM Cutter (Circular Fabric Cutter): This specialized tool is essential. It is designed to cut a precise circular sample of fabric with a known area. This area is almost always 1/100th of a square meter (100 cm2).
    • Precision Digital Weighing Scale (Balance): This scale must be capable of measuring weight accurately to at least two decimal places (e.g., 0.01 grams).
    • Cutting Pad: A rubber or cork mat to protect the cutter blade and the surface underneath.

    2. The Step-by-Step Measurement Procedure

    Step A: Conditioning

    The fabric must be tested under standard atmospheric conditions (standard temperature and humidity, usually 20° C and 65% Relative Humidity). Moisture absorbed by the fabric can drastically affect its weight, so it’s critical to allow the fabric to “condition” (stabilize) in a controlled environment before testing.

    Step B: Cutting the Sample

    1. Place the fabric flat and wrinkle-free on the cutting pad.
    2. Place the GSM cutter firmly on the fabric.
    3. Press down and rotate the cutter’s handle to cut a perfect circular sample.
    4. Remove the sample carefully using tweezers (to avoid adding skin oil/moisture).

    Step C: Weighing and Calculation

    Since the standard GSM cutter cuts a sample that is 1/100th of a square meter (100 cm2):

    1. Weigh the cut fabric sample on the precision digital scale.
      Weight of Sample = W grams.
    2. The calculation is then straightforward: to find the weight of 1 square meter, you simply multiply the weight of the 1/100th square meter sample by 100.
      GSM = W X 100

    Example: If the cut sample weighs 1.85 grams, the GSM is 1.85 X 100 = 185 GSM.

    This method is widely used in calculating GSM of knitted fabrics that gives accurate result. It is easy to use and widely accepted in the knitting and textile industry. Some people also measure GSM by cutting the fabric into sqaure or rectangular shape that gives area measurement as 100 cm2.

    Understanding GSM allows you to compare fabric quality accurately and ensures you choose the perfect knitted fabric for your specific needs, whether it’s a light tee or a heavy fleece!

  • Screen Printing on Knitted Fabrics: Mastering the Art of Designs on Stretch

    Screen Printing on Knitted Fabrics: Mastering the Art of Designs on Stretch

    Welcome back to Knitted Fabric.in! In the world of textile decoration, screen printing stands as a classic and versatile technique, allowing for vibrant designs and intricate patterns on a wide array of fabrics. While it’s commonly associated with woven materials, screen printing on knitted fabrics is equally popular – just think of almost any graphic T-shirt or hoodie you own!

    However, working with the inherent stretch and unique texture of knits presents its own set of challenges and specialized techniques. For those of us keen on understanding how those striking designs appear on our favourite comfy garments, let’s dive deep into the art and science of screen printing on knitted fabrics.


    What is Screen Printing? A Quick Recap

    Before we talk about knits specifically, let’s briefly recap the screen printing process:

    Screen printing, also known as silk screen printing, is a stenciling method where ink is forced through a mesh screen onto a substrate (in our case, fabric).

    1. Screen Preparation: A mesh screen (traditionally silk, now often polyester) is stretched over a frame. A stencil of the design is created on this screen, blocking off areas where ink should not pass through.
    2. Placement: The fabric is laid flat on a printing platen (board).
    3. Ink Application: Ink is placed on the screen.
    4. Squeegee Action: A squeegee is used to pull the ink across the screen. This action forces the ink through the open (non-stenciled) areas of the mesh, directly onto the fabric below.
    5. Curing: The printed fabric is then sent through a dryer or heat press to cure the ink, making the design permanent and washable.

    This layered process allows for crisp designs and vibrant colours, with each colour in a multi-colour design requiring a separate screen.


    The Unique Challenges of Screen Printing on Knitted Fabrics

    Knitted fabrics, with their characteristic looped structure, behave very differently from stable woven fabrics. This stretchiness and texture introduce several considerations for screen printers:

    1. Stretch and Distortion: This is the biggest challenge. Knits inherently stretch. If the fabric stretches during printing, the design can become distorted, crack, or lose detail once the fabric relaxes.
    2. Fabric Instability: Knitted fabrics can move or shift on the platen more easily than wovens, leading to misregistration (colours not lining up correctly) or blurred prints.
    3. Ink Penetration and Coverage: The open, looped structure of some knits can cause ink to penetrate too deeply, bleeding through to the back, or result in patchy coverage if the ink isn’t optimized.
    4. Handfeel (Feel of the Print): Knits are prized for their softness and drape. A heavy, stiff print can ruin this, making the garment uncomfortable.
    5. Pilling: Rough inks or improper printing can sometimes exacerbate pilling on certain knitted fabrics, especially fleece.

    Mastering the Art: Techniques for Quality Screen Printing on Knits

    To achieve excellent results on knitted fabrics, printers employ specialized techniques and materials:

    1. Proper Fabric Tensioning:
      • Platen Adhesive: A strong but temporary adhesive (like spray tack or water-based adhesive) is crucial to hold the knit fabric firmly in place on the platen, preventing movement and stretch during printing.
      • Minimal Stretching: Operators must ensure the fabric is laid flat without being stretched. Laying it relaxed is key.
    2. Ink Selection is Crucial:
      • Plastisol Inks: These are widely used due to their opacity and vibrant colours. For knits, specialized soft-hand plastisol inks or low-bleed plastisols (for fabrics that tend to bleed dye into the ink) are preferred. They sit on top of the fabric.
      • Water-Based Inks (Discharge & Soft Hand): These inks penetrate the fabric more and become part of it, resulting in a much softer handfeel.
        • Discharge Inks: Remove the dye from a dark fabric and replace it with the ink’s pigment, creating an incredibly soft, vintage look. Best for 100% cotton knits.
        • Soft Hand Water-Based Inks: Designed for a natural feel, great for lighter fabrics.
      • Stretch Additives: For highly stretchy knits like rib, specific additives can be mixed into the ink to give it more elasticity, preventing cracking when the fabric stretches.
    3. Screen Mesh and Emulsion:
      • Lower Mesh Counts: Often, a slightly lower mesh count (e.g., 110-160 threads per inch) is used for printing on knits, especially for base layers, to allow more ink to pass through for good coverage on the textured surface.
      • Thicker Emulsion: A thicker layer of emulsion on the screen can create a larger ink deposit, helping to “fill” the valleys in the knit structure for a smoother print.
    4. Squeegee Technique:
      • Lower Pressure: Excessive squeegee pressure can push ink too deep into the fabric, causing bleed-through or reducing print crispness.
      • Proper Angle: A consistent squeegee angle ensures even ink deposit.
      • Flood Stroke: A “flood stroke” (gently pushing ink across the screen without downward pressure) helps fill the mesh openings before the print stroke, leading to better coverage.
    5. Flash Curing and Curing:
      • Flash Curing (Intermediate Drying): For multi-colour designs, a quick flash cure between colours stabilizes the previous layer, preventing smudging and ensuring clean registration for subsequent colours.
      • Thorough Curing: Proper final curing is essential. If the ink isn’t fully cured, it will wash out or crack easily. However, overheating can damage delicate knits. Temperature and dwell time must be precise.

    Popular Knitted Fabrics for Screen Printing

    While the techniques above allow printing on many knits, some are more common:

    • Cotton Jersey Fabric: The king of T-shirts! Excellent for screen printing with most ink types, offering good absorption and a classic look.
    • Cotton-Poly Blends (Jersey, Fleece): Offers a balance of cotton’s printability and polyester’s durability. Special attention to low-bleed inks might be needed to prevent dye migration from polyester.
    • French Terry Fabric: Popular for hoodies and sweatshirts, providing a good surface for designs.
    • Fleece Fabric: Can be screen printed, but often requires a thicker ink deposit and careful technique to achieve good coverage on its fuzzy surface, while maintaining a soft hand.

    Ensuring Quality: What to Look For

    When evaluating a screen-printed knitted garment, look for:

    • Smooth Handfeel: The print should feel soft and integrated with the fabric, not stiff or like a thick plastic layer.
    • No Cracking: The design should not crack when the fabric is gently stretched.
    • Sharp Edges: Lines and details should be crisp, not blurry or feathered.
    • Consistent Colour: The colour should be uniform across the entire design, without patches or unevenness.
    • No Bleed-Through: Ink should not visibly show through to the inside of the garment.

    Conclusion

    Screen printing on knitted fabrics is a highly skilled process that beautifully combines art and science. By understanding the unique properties of knits and employing specialized techniques, printers can transform a simple piece of fabric into a canvas for creative expression.

    So, the next time you admire a vibrant design on your favourite knitted T-shirt, you’ll know it’s not just ink on fabric, but a testament to precision, expertise, and a deep understanding of textile dynamics.

    Stay stylish and informed with Knitted Fabric.in!

  • How Circular Knitting Works: The Seamless Secret Behind Your Favourite Knits

    How Circular Knitting Works: The Seamless Secret Behind Your Favourite Knits

    Welcome back to Knitted Fabric.in! We’ve talked a lot about different types of knitted fabrics, their unique qualities, and how they’re finished. But have you ever wondered how many of your everyday knitwear items – from T-shirts and innerwear to socks and activewear – are made in a continuous, seamless tube? The answer lies in a fascinating process called circular knitting.

    Understanding the machinery behind the fabrics you love is incredibly insightful. Let’s pull back the curtain and explore the ingenious world of circular knitting.


    What is Circular Knitting?

    At its simplest, circular knitting is a method of knitting fabric in a continuous, tubular form, without any seams. Unlike flatbed knitting machines that produce flat pieces of fabric (which then need to be cut and sewn together), circular knitting machines create a seamless “tube” of fabric, much like knitting a long sock or a continuous sleeve on large, round needles.

    This technique is incredibly efficient and is the backbone of mass production for many knitted garments worldwide, including a significant portion of the knitwear produced in India.

    Circular Knitting Machine diagram

    The Core Components of a Circular Knitting Machine

    To understand how it works, let’s look at the main parts of a typical circular knitting machine:

    1. Needle Cylinder: This is the heart of the machine. It’s a rotating cylinder (or sometimes a rotating cam box with stationary needles) that holds a large number of knitting needles arranged in a perfect circle.
    2. Needles: These are specialized latch needles (most common) or sometimes compound needles. Each needle moves independently up and down within its slot in the cylinder.
    3. Cams: These are stationary metal tracks that guide the needles’ movement. As the needle cylinder rotates, the needles ride up and down these cam tracks, performing the actions required to form loops.
    4. Yarn Feeders: These are mechanisms that supply yarn to the needles as they knit. A circular knitting machine can have multiple yarn feeders, allowing several courses (rows) of knitting to be formed simultaneously, dramatically increasing production speed.
    5. Sinkers: Small metal elements located between the needles. They assist in holding down the fabric loops as new loops are formed, ensuring consistent stitch formation.
    6. Fabric Take-down: Located below the knitting area, this system (usually rollers) gently pulls the newly formed fabric tube downwards, preventing it from bunching up and maintaining proper tension.

    How the Magic Happens: The Step-by-Step Process

    The process of circular knitting is a continuous dance of needles and yarn, forming loops one after another:

    1. Yarn Feeding: Yarn from cones is fed through tension guides to the yarn feeders, which present the yarn to the needles.
    2. Needle Movement – Raising: As the needle cylinder rotates, the cam tracks guide individual needles upwards. The hook of each needle rises above the old loop it’s holding, and the latch (a small movable part on the needle) opens up.
    3. Yarn Laying: The yarn feeder lays a new segment of yarn into the open hook of the raised needle.
    4. Needle Movement – Drawing Down: The cam then guides the needle downwards. As it descends, the old loop (which was held by the latch) slides up the needle stem and pushes the latch closed.
    5. Loop Formation: The newly laid yarn is pulled through the old loop. As the needle continues its downward movement, the old loop casts off, and the new loop is held securely by the needle’s hook.
    6. Fabric Take-down: The newly formed row of interlocked loops (a “course”) adds to the fabric tube, which is then gently pulled downwards by the take-down rollers.

    This entire sequence happens at incredible speeds, with hundreds or even thousands of needles working simultaneously to produce a seamless fabric tube. Because there are multiple yarn feeders around the circumference, several rows of knitting are being formed at any given moment, leading to very high production rates.


    Types of Circular Knitting Machines

    Circular knitting machines come in various configurations, each suited for different types of fabrics:

    • Single Jersey Machines: These machines have one set of needles and produce single-sided fabrics like the classic T-shirt material. They are very fast but the fabrics can curl at the edges and may be prone to spirality.
    • Double Jersey Machines (e.g., Rib, Interlock, Pique): These machines have two sets of needles (one in the cylinder and one in a dial above it). This allows them to create more complex, often reversible, and more stable fabrics like rib knits, interlocks, and pique. They are slower than single jersey machines but produce fabrics with better dimensional stability and less curl.
    • Jacquard Machines: These are advanced circular knitting machines that can create intricate patterns and designs by individually selecting needles to knit or miss stitches, allowing for complex fabric aesthetics.
    • Fleece Machines: Designed to produce fabrics like fleece and French terry, often with special attachments for brushing or loop creation.

    Advantages of Circular Knitting

    The widespread use of circular knitting stems from its numerous benefits:

    • High Production Speed: Multiple yarn feeders and continuous operation allow for very fast fabric production, crucial for meeting market demands.
    • Seamless Construction: Produces fabrics in a tubular form, eliminating side seams in garments like T-shirts, vests, and socks, which enhances comfort and reduces manufacturing steps (no need to sew side seams).
    • Cost-Effective: High output combined with reduced sewing needs can lead to lower production costs per metre or per garment.
    • Stretch and Comfort: The inherent nature of knitting creates stretchy, comfortable fabrics, which is further enhanced by the relaxed tubular process.
    • Versatility: Capable of producing a wide range of fabric types, weights, and structures (jersey, rib, interlock, fleece, etc.).

    The Role of Circular Knitting in Your Wardrobe

    Next time you pull on your favourite T-shirt, a comfy pair of track pants, or a seamless inner vest, take a moment to appreciate the unsung hero: the circular knitting machine. Its ability to rapidly produce high-quality, comfortable, and seamlessly structured fabrics is what makes so many of our everyday garments possible.

    Understanding these processes not only deepens your appreciation for textiles but also helps you make informed choices about the quality knitted fabrics you bring into your life.

    Stay curious and keep knitting with Knitted Fabric.in!